
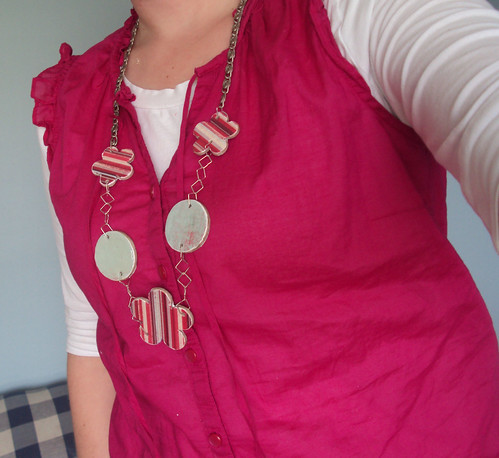
Roberts (our big local craft store) is going out of business. Sniff. But, I have been stocking up on some goods as they are closing out their merchandise. With some of my goods I came up with this necklace.

Supplies:
Chipboard shapes
Largish Jump Rings (I had square ones)
Pliers
Scrapbook Paper
Modge Podge
Diamond Glaze
Big Bite
Necklace Chain
So, first I laid out the shapes in a way that I liked.
Then, I traced the shapes onto scrapbook paper and cut them out. Then I applied to the chipboard with mod podge. After that I filed the edges to give it a more worn look.

Then, apply a layer of Mod Podge to the top of that and let dry. After that is dry,
add a lay of Diamond Glaze and let sit at least overnight.
Repeat for the opposite side, because the chipboard will flip. Choose the same paper or coordinating paper.
Then I used my Big Bite to punch holes through the sides.
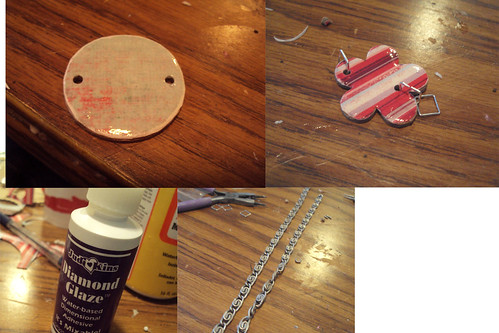
After that I put about 5 jump rings in between each chipboard piece. Then I used my pliers to cut the chain to the length I liked, and attached the chain with more jump rings. Then I used one final jump ring to attach the chain together. (It is long enough that it slips over my head and doesn't need clasps or anything)


This is so fabulous. SO awesome!
ReplyDeleteVery Cute!
ReplyDeleteHey ladies! Great project! I couldn't find an email but I wanted to invite you to guest post for us for Fabulous Friends Wednesday at Craft Envy? It would be for our May 5th feature. Would that work for you guys? Please let me know, this project you just did would be perfect! Please say yes? Have a great day!!!
ReplyDeleteTina! Your trunk idea... with the holes for the cords... is genius. I never thought of that! I actaully got really impatient this weekend and moved half of my living room all around, and found a new solution for the TV. I just can't sit still when something is "off",,, yanno. =)
ReplyDelete