Showing posts with label SIMPLIFY. Show all posts

Friday, October 22, 2010

Super Yummy French Bread


Last time I was at the Prepared Pantry I saw this base for French Bread. Curious I decided to give it a try. It was sooo good. It had that distinct french bread taste. I've tried to make homemade French bread before. It was good, but tasted like regular homemade bread.

The instructions included were fairly easy to follow, but not quite simplified enough for me.
If you get a chance to get some of this awesome stuff and want an easier method, here is what I did:
Ingredients:
One cup Base for French Bread
2 cups warm water (about 110 degrees)
3 1/2 cups bread flour
1 seven-gram packet of yeast
Put all ingredients in your bread maker and use the dough setting. When that is done, shape into two long loaves on a cookie sheet, cover with plastic wrap sprayed with cooking spray and let rise until really puffy in a warm place (about an hour). Preheat your oven to 375. Bake for 25-35 minutes or until golden brown.
Store leftovers in a paper bag. (Not plastic).
Best eaten within a couple of days.
Perfect with some soup or chili.

Sunday, October 10, 2010

Simplified Mango Sticky Rice

DSC06705
Mango Sticky Rice: One of our good friends (and one of the best cooks I know) writes the food blog Salt and Flattery. He did a post on Mango Sticky Rice that looked soo good. But it was a little too extensive for me (and I couldn't find Thai sticky rice or have a bamboo steamer) So I did what we did best around here and simplified. It turned out pretty darn yummy. I would be curious to see how my simplified version compared to his. Here is my version:

Mango Sticky Rice

Ingredients:

1 Cup Thai Jasmine Rice (Found in the Asian Section)
1 Can (14 oz) Lite coconut milk
A little less than 1/2 cup of sugar
1/2 teaspoon salt
2 mangos, peeled and chopped (I used frozen that I thawed)


Mix the coconut milk, sugar, and salt and add enough water that it makes 1 3/4 cup liquid. Bring to a boil in a saucepan and add rice. Cover and simmer over low heat for 15-20 minutes without removing the lid. Stir in mangos and serve.


I thought it was delicious. My husband thought it was like dessert rice. Half of the kids liked it.

Tuesday, October 5, 2010

Homemade Laundry Soap

DSC06704

Yes, you heard me-homemade!! Who knew?? We learned this recipe at a church meeting a few months ago. I recently ran out of the store bought stuff and decided to give it a try. Then yesterdays dirty clothes got to be the lucky ones to give it a go. And yes it worked. Everything was clean.
And the best part is that it is stinking cheap. I haven't calcuated exactly but it has to be way less than a penny per load. I don't know how widespread this recipe is online, but I still had to share it with you. I heard that the 18-kids and Counting lady uses this stuff to do her laundry. It really only took about 10-15 minutes to make after you have everything gathered.

I found the Fels-naptha and washing soda at Winco (our grocery store)

Liquid Laundry Soap

4 cups Hot tap water
1 Fels-naptha Bar
1 cup washing soda
1/2 cup Borax

Directions: Grate Fels-soap and add to hot water. Stir over medium-low heat until the soap is dissolved. Fill one gallon bucket 1/2 full of hot tap water. Add soap mixture, soda, and borax until dissolved. Add more hot water to fill up 5 gallon bucket. Let sit over night. Then when cool you can add 10-15 drops essential oils per 2 gallons of soap.

I'm going to use a leftover plastic gallon ice cream bucket to fill up for easier use, then go back to the five gallon bucket to refill that. You might have to restir once in awhile.

Top loaders uses 1/4 cup per load.
Front loaders uses 1/8 cup per load.

Thursday, May 20, 2010

Otter Pops Solutions

DSC05779

Yes, I'm a bad mom and let my kids have otter pops despite their high fructose corn syrup. I have bought molds to freeze fruit juice in, I just need to get to it. Anyway, we usually have a major problem with scissors and otter pops. They lose them, ruin my good pairs with stickiness, etc etc.

So, a year or two ago my husband came up with solution. We took wire and hooked onto something near the freezer. We originally used string, but it was too tempting to cut them off with the said scissors. No more looking for scissors or ruining mine.

Now, if only I had a solution for wrappers on the ground....

DSC05780

Sunday, May 9, 2010

Menu Planning take 626

DSC05803

I have tried a lot of different systems to organize my recipes and plan my menus. I haven't stuck with any of them. This week I tried something that just might work. I'm kind of excited about it. I read somewhere about having a having a theme for each night of a week.
They listed some suggestions, but I went through my recipes to see what categories we eat the most. Here is what I came up with:

Sunday--Sunday Foods (you know like roasts, scalloped potatoes etc.)
Monday-Mexican
Tuesday-Italian, Pasta, Pizza
Wednesday-Hamburgers, Sliders, Sandwiches, Sloppy Joes, and Wraps
Thursday-Salad, Soups, Chili (I'm the only one who will eat lettuce, but I still make salads that they can eat on rice, chips, or plain)
Friday-Grillin and Meat night- Kind of a man's night, meat and potatoes. (Pork, chicken, steak kebabs etc)
Saturday-Misc.Breakfast for dinner (I have a whole different binder for breakfast), casseroles, and Asian

DSC05804

So, basically after I sorted my recipes, I put them into a big binder with dividers. Then, when I am menu planning I just look through each day, and put the recipe I'm using that day in the front of the section so it easy to find. On the back of the sections divider (which I just cut down a 12x12 to size) I can write down suggestions for that category that don't have recipes ( like tacos), or page numbers of recipes in books that fit that category.

I'm excited. I just planned out the next two weeks.

Mon-BBQ Chicken Quesadillas
Tues-Pasta Meal from freezer group
Wed-Croque Madame Sandwiches
Thurs-Chinese Chicken Salad
Fri-Grilled chicken and Parmesan potatoes
Sat-Breakfast sandwiches
Sun-Scalloped Potatoes with ham
Mon-Crock pot burritos
Tues-Beef Stroganoff from freezer group
Wed-Sloppy Joes
Thurs-Chicken Chowder
Fri-Parmesan Chicken
Sat-Baked egg and ham cups with smoothies


Monday, April 19, 2010

One simple laundry tip

tags

I had three boys in a little less than four years. They are close in age. One is a little bit height-challenged and even though he is almost six can still fit in some 4's. And the four-year-old wears 4's. I wish we just had a big bin of pants, shirts, socks, etc. But they don't really appreciate that.

Sooo, awhile ago I came with a system for pants, shirts, underwear, socks, etc.
The oldest gets one cut in his tag (or one tick with a permanent marker), the 2nd one gets two cuts, the third one gets three. Then, when the item gets too small and is ready to be passed down, another cut or tick mark gets added to the item for the next boy.

It has made laundry a lot nicer.

Tuesday, March 9, 2010

Easy Hamburger Cookies


Spring is starting to tease us around here. It was 40 yesterday and I didn't even wear a jacket to run errands! So, it is getting my in the mood for summer foods and parties. Here is an easy treat that I've been making since I was about 9. I got a BHG Kids Cookie Cookbook for Christmas and this recipe came from there. Except, they called for york peppermint patties. Trust me, grasshopper cookies are way yummier.* It is always a hit at BBQ's and better yet, you can sit back and let your kids make the whole thing.


Hamburger Cookies
Few drops water
Few drops green food coloring
1/2 cup flaked coconut
48 vanilla wafers
24 grasshopper cookies
sesame seeds or poppy seeds
Turn over to 350. In a small screw-top jar combine the water and the green food coloring. Add coconut; cover and shake until all of the coconut is tinted. Set aside.
Place half of the vanilla wafers, flat side up on an ungreased cookie sheet. Top each with a grasshopper cookie. Place in the oven for about 1 minute or just until chocolate begins to soften.
Immediately sprinkle each with a tsp. of tinted coconut. Top with another vanilla wafer. Press gently. Brush the top vanilla wafers with just enough water to moisten so the sesame seeds will stick.
Sprinkle each cookie with a little sesame seed and serve.

*Make your own grasshopper cookies. Find out how here.

Monday, March 8, 2010

Back to Basic Chore Charts

I've tried several chore charts. Mostly elaborate ones that are too complicated to stick with. So, in my effort to simplify I've come up with two simple systems.

I remembered a similar chart my mom had when I was little.

This one I made a page with my three boys pictures in Photoshop. Then I made a circle divided three ways that has a list of their responsbilities. I laminated each part and stuck a brad in the middle.

We will turn it every week so the assignments will change up weekly. It goes on the fridge and will hopefully eliminate fighting over who has to do what.
I'm also using this scrabble tile board as incentive to be good. I wrote the boys names on top and give them 14 letters at the beginning of the week. They lose letters for things like disobeying, fighting, saying "suck", leaving dirty socks out, slamming doors, etc. At the end of the week if they have 10 letters left, they can choose a prize. Mostly they are thrilled to get a soda or a Propel. It doesn't take much to please kids. Last week I had a child lose 5 and begged and begged to able to earn one back by cleaning. I let him, but I'm not sure if they should earn back letters or not. What do you think?

Monday, February 22, 2010

Easy fruit smoothies


When you just can't get to Jamba and need your smoothie fix-here is an easy one. It only has two ingredients:


One cup pineapple-orange juice

One heaping cup of frozen strawberries

Blend together.

Yum!

Of course this would work with any fruit/juice combo.

Saturday, February 20, 2010

Another easy fun breakfast

Sometimes I don't want to put in the effort and time to do fun things with the kiddos. But last night for dinner, I was in the clean- out- the- freezer mode and made a quick fun dinner out of Eggos, frozen blueberries, and frozen strawberries (thawed) and Cool Whip. The kids loved and didn't care that no time went into it.

Tuesday, February 2, 2010

Important Papers Board

Please tell me that I'm not the only one who gets piles like this:

Whatever happened to a paperless society? Anyway, sometimes in my pile of important papers, the most important ones get lost easily. Imagine that.

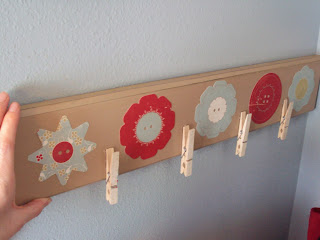
When I saw this board I knew exactly what to do with a board I had with vinyl letters that no longer matched my decor. I'm not going to use it for drying art projects though. I'm going to put the most important of the important papers on this board. And they will stay there until I don't need them anymore. Notes for events at school, this weeks recipes etc. etc.

To make, I just painted the color I liked, sanded the edges slightly, and used Mod Podge to adhere some cute cut-outs I had in my stash. Then I add paper to the front of some clothespins and used my GLUE GUN to glue those onto the board.
Don't mind the hand. It probably won't actually be hung on my wall until my husband is done with his busy time. But, I had to check #4 off my list. Because isn't checking things off of your list the best-virtually or not!

Monday, January 18, 2010

Solving the cup issue....

I don't know if your house is like mine or not, but this what my counter ends up looking like at the end of the day. Making me seriously envy my sister-in-laws drinking fountain she has in her HOUSE! Jealous.

Anyway, I've been trying to think for a while how to solve this. I even contemplated buying those expensive name cups at Toys R Us. But I would have to special order two names because they aren't common. Anyway, I saw this idea and knew I had my solution. I even had Staz-On but I had never used it. So, I picked up these plastic tumblers fairly cheaply at the big store that starts with W. And I stamped the names for each of my kids on three cups each. They get one cup a day. And the know which one is theirs. I threw the rest of the gross cups away. Yeah. #1 on my project list complete.

And yes, I did wash the cups and the ink really does stay on! (Hence the name)
Nice new, clean, personalized cups!


Thursday, January 14, 2010

Weekly Menu

My friend Tina comes up with a word or phrase of the year instead of writing down New Years resolutions. I didn't really do any resolutions this year, but if I had to pick a word for me it would be: FOCUS

I have good intentions to be organized, but sometimes I'm an all-or-nothing kind of gal. My hubbie can tell you about all of the elaborate menu systems and chore chart systems I have spent hours preparing only to abandon them after one week or less.

And sometimes I have good intentions to start something, but don't because I want to wait until it's perfect. Like my latest menu system was to write down all of the dinners we eat on a seperate card, and then pick from the cards for the weekly menu. But, then I get distracted and didn't finish writing down the meals and gave up.

So for me. Simpler is better. There is nothing wrong with a ripped out piece of paper from a notebook tacked to my fridge. It will still get meals made even though it is not in a fancy decorated box.

So, anyway, I made a menu for this week and next (I know the week is almost over). I love reading the weekly menu over at Sister Stuff and you have to check out This Week for Dinner. Not only do they post weekly menus and then people can add their own, they also post recipes and cooking tips.

Anyway, I analyzed all of the freezer meals I still have in my freezer from my freezer group and decided I better get those eaten.

So, here is my menu:
Wed: Brinner: French Toast and Cheesy Eggs
Thurs: Sloppy Joes
Fri: Honey Ribs from Freezer Group
Sat: Pizza Calzones
Sun: Crock Pot Italian Chicken
Mon: Mu Shu Chicken
Tues: Mexican Chicken and Rice Dinner
Wed: Tortilla Soup
Thurs: Sausage Pasta Dish
Fri-Papa Murphys
Sat-Hopefully date with my hubbie!


Saturday, January 2, 2010

Bakugan and Bakugan Card Holder Tutorial

If you have a house full of little boys (or some girls) you probably have Bakugans laying around your house. We do. And I never really have a place to put the weird little things. So, I came up with this:

I'm going to attempt to do a tutorial. It did give me a newfound respect for people who make easy to understand, detailed tutorials. I will do my best.

The final product will hold 24 Bakugans (2 in each pocket) and several cards

Supplies:

Heavy fabric (I used canvas) cut to 25 inches high x 18 wide (you might have to trim some off the bottom at the end)
Single fold bias tape (or make your own like I did-learn how here)
Fabric for pockets (I used a sheet remnant I had from making curtains years ago. It was nice to have one long piece of material, but not necessary)
Large Eyelets or grommets
Ribbon
Mounting Hook with command strips
Fabric paint (or acrylic paint and textile medium)
1) Cut your heavy fabric to 25x18 wide
2) Cut a long piece of fabric 4 inches tall by 48 inches long.
3) Fold over 1/2 inch piece 0f fabric from the top and iron it down.
4) Sew along the folded edge.
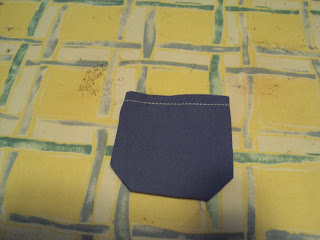
5) Cut this long strip into 4 inch lengths. ** If you don't have a long strip of fabric you can do steps 2-5 individually. It just saves some time to do it all at once. 6) Snip both corners of the bottom on each piece of fabric. Use the same corner as a guide so you can get equal corners.7) Fold each side (Except the top) over a half inch and iron each side. Repeat for all pockets.


8) Arrange and pin your pockets onto your canvas.

9) I bought a twin needle when I first got my sewing machine and haven't used it yet. I thought this would be a fun place to try it out so the pockets would look more authentic.
Sew around each pocket (leaving the top open). Read your manual to find out how to thread your twin needle. This is what the top of my machine looked like.
10) For the card pockets on the bottom do the same thing as the Bakugan pockets. Except cut the fabric to about 4 3/4 tall by 4 1/2 wide. And I made these plain rectangles without the snipped corners. You don't have to the extra space between the top pockets and the bottom pockets like me. Don't ask!

11) Cut any extra fabric off of the canvas.
12) Sew your bias tape into place around the edges.
13) For the BAKUGAN on top, I used the freezer paper stencil method found here. Only I found the coolest stuff you need to have in your supplies. It's called textile medium and it turns any acrylic paint into fabric paint (which is pricier than acrylic paint).
I found the logo online and copied it on my computer. Then in Photoshop I sized it to the size I wanted and printed it out for my outline on my stencil. I did a post earlier about using a Crystal Light canister. The little tubs can also be useful for things like mixing small paint projects.And plastic baby food jars can come in handy when storing the paint for the next coat.

14) Set your eyelets or grommets on the top. I used my Big Bite, but you can buy grommet setters at the fabric store if you don't have one. Then tie some ribbon through the holes. I hung it on the Command strips mounting hooks in my boys room.

Now, the Bakugans can be kept in one place. And I won't feel so guilty about my next 50 projects being for my daughter. If you make one of these, leave a link so I check it out. This could be adapted for any little toy like Polly Pockets etc.