Wednesday, March 31, 2010
More tips on the Marshmallow Easter Eggs
In case you were trying to make the marshmallow Easter eggs, I put a few updated tips on the original post. The changes are in red.
Tuesday, March 30, 2010
Homemade Marshmallow Easter Eggs

This is a work in progess recipe/tutorial. Any additional tips or changes will be in red.
I know what you are thinking, store bought chocolate marshmallow candy isn't really that good. Trust me, I know. I won't touch the stuff. But this homemade version will change your mind. It is soooo good. Even though I haven't finished mine, I have had my MIL's and my sister-in-laws many times.
So, if it is so good, why haven't I tried it yet? A few reasons. One maybe laziness, another maybe a secret rebellion against the family tradition. But, then I heard on the radio about a huckleberry flavor at The Prepared Pantry. And the thought came that a huckleberry flavored chocolate marshmallow Easter egg just might be to die for. (Not that the cherry, lemon, and orange from the in-laws weren't already really good, but come on--Huckleberry!) So, I gathered up the kids and headed to Rigby to get some. While I was there I drooled over the apricot and raspberry flavoring, but decided to be good and only get the huckleberry and the lemon. I might have to go back and get the others very soon.
I, of course, had to sample both flavors in the mixing bowl, and trust me this is going to be good.
So, here is the 411:
Chocolate Marshmallow Easter Eggs
For each batch you will need:
1 Envelope Gelatin
1/3 cup cold water
1/2 cup sugar
2/3 cup corn syrup
1 teaspoon vanilla (yeah right!) or other flavoring
Food coloring to match the flavor
Flour
Cold Egg
2 cups chocolate chips (milk chocolate will bring out the flavor better, but I actually love using the candy bar melting bar from Sam's Club, you don't have to add anything to it)
2 Tbs. oil
Put 1-2 inches of water in a pot on high heat to get to a rolling boil. Soften 1 envelope gelatin in 1/3 cup cold water in a glass bowl that will fit over the pot, add sugar.  Place over boiling water and stir until dissolved, leave it on the full boil for about 6-7 minutes, then turn off the heat but still leave it on for another 2-3. The liquid should be almost clear. My sister-in-law also said she has let her marshmallows it the fridge before dipping. I haven't tried that yet. I was trying to make two batches at once until I realized I only have one mixer. So, probably better just to do one at a time.
Place over boiling water and stir until dissolved, leave it on the full boil for about 6-7 minutes, then turn off the heat but still leave it on for another 2-3. The liquid should be almost clear. My sister-in-law also said she has let her marshmallows it the fridge before dipping. I haven't tried that yet. I was trying to make two batches at once until I realized I only have one mixer. So, probably better just to do one at a time.Pour the corn syrup into your mixer bowl. Add flavoring and food coloring. Pour gelatin mixture in and beat on high speed for 10-14 minutes. Mine took 14 minutes. The color and consistency should be toothpaste- like. Not too runny but not too thick either.
While you are waiting for that to mix, prepare your 9x13 pans. Fill them up with flour, and then make depressions with your cold egg. Then take a small measuring cup and start filling up your depressions with the marshmallow mixture. It is kind of fun to play with because it won't stick to the flour.


Let the marshmallows sit on your counter for until set up. I would say at least 6 hours or overnight. They should be fluffy and not gel-like or liquidy on the inside.
When you are ready, melt your chocolate chips and oil together to dip the marshmallows. Put the dipped eggs onto waxed paper on a cookie sheet and set in fridge until it hardens. (About 10-20 minutes).
After it hardens you can decorate with white chocolate drizzles, sprinkles, etc. I did some sugar sprinkles on my first batch, but I actually think it detracted from the flavor. I guess you have to decide if you are going for looks or taste.
My sister-in-law put a great tip in the comments. She said to take a plastic fork and break off the two inner prongs, and it makes a great dipping tool. We took a chocolate dipping class that had a few tips for dipping. If the extra edges around your candy bug you, you can 1) take a knife and shave it off 2) take a super hot glass of water and rub your candy on it. It will melt that extra edge off. I can't remember anymore tips. Read the comments section for some more tips from my sister-in-law.

Trust me, after your family tries these you will have a new Easter tradition to do every year!
Edible Easter Nests
 This is one of my favorite treats to make at Easter. When I taught Kindergarten I made these with my students every year. They loved it! My oldest is finally getting to where she can do things like this. It's so fun and super easy! Enjoy!
1 - 11oz. bag butterscotch chips
1 tbsp butter
3/4 cup chunky peanut butter
3 c. marshmallow creme
1 - 12 oz package chinese noodles
coconut
green food coloring
jelly beans or other Easter candy
Melt and mix the first 4 ingredients. Stir the noodles in. Lightly grease muffin tin and drop by spoonfuls into cups. Form cups like nests with your fingers. Put some coconut in ziploc bag with green food coloring and shake until coconut is green. When the nests have cooled, remove them from the muffin tin and fill with green coconut. Garnish with jelly beans and other Easter candy.
Monday, March 29, 2010
My Creative People Reading List
I use Google Reader. I love it. I can scroll through all of my favorite blogs quickly and see what catches my eye. Therefore, I don't have a blog list on the sidebar. Maybe because the blog is one place I can manage clutter.
But, anyway, since I'm in a creative funk at the moment I thought I would share who is on my "creative people" list in google reader and give them a shoutout. Scrolling through this list can give a busy mom sanity sometimes, so thank you. So if you need some inspiration, here are my current favorites. Some you have probably heard of, some maybe not. Enjoy.
Alchemy Junk
Blue Cricket Design
Chocolate Sundaes
Craft Envy
Craft Rookie
Craftaholics Anonymous
Crafterhours
Fireflies and Jellybeans
Giverslog
Homemaking Fun
How Does She
Infarrantly Creative
Inspiring Creations
It's good for the heart
Lil Blue Boo
Little Birdie Secrets
Little Inspirations
Make and Takes
Make it and Love It
Moda Bake Shop
Not So Idle Hands
Ramblings of a Crazy Woman
Roots and Wings
Ruffles and Stuff
Simply Designing
Sisters' Stuff
Smashed Peas and Carrots
Someday Crafts
Tatortots and Jello
The Creative Crate
The How-To Gal
The Idea Room
The Polka Dot Chair
U Create
Sunday, March 28, 2010
April Fools Day
 Life has been a little busy lately, but I thought I would share a couple of things if you needed a little April Fools Day inspiration. Here is the dinner we made last year to trick dad, in case you didn't get Family Fun last year. It was a dinner of fish sticks, ketchup, peas, with a gummy worm coming out of an apple. We also replaced the cheetos with carrots, and the when you go to drink the juice you get an surprise when it is jell-o. The kids had fun tricking their dad.
The fish sticks were sugar wafers covered with peanut butter then dipped in crushed cereal. (Actually pretty yummy) The peas are rolled airheads and the ketchup is jam.
This year I think I might try a crazy menu where the kids will choose items from a list (like Disney Characters), and see what they end up with.
Today, I also tried something really yummy from Simply Designing. Almond Chocolate Meringues! Yum! And a lower sugar alternative to get your Sunday afternoon cookie fix.
Sorry I'm not posting anything too original. Hopefully I will get back to crafting soon. This week the kids are home all week, so we have to think of things to do to entertain them. Happy Spring!
Sunday, March 21, 2010
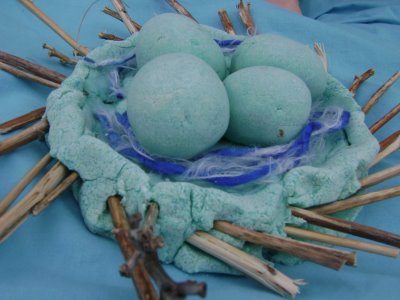
Bigger pictures (and playdough Easter nests)
I'm playing around with trying to make my images bigger. But, you probably didn't come here just for that, did you?
So, here is a picture of an Easter project we did last year from Family Fun.
This is a great playdough recipe:
1 c. flour
1 Tbsp. cream of tarter
1 Tbsp. cooking oil
1/2 cup salt
1 c. water
coloring
Cook over medium heat until dough leaves side of pan. Knead until smooth. Stays soft in tupperware or plastic bag. Dries on carpet so it can be vacuumed up.
The rest is pretty self explanatory, don't ya think?
Oh, and here is the link I'm following to try to make my pictures bigger. It's a little bigger than what I have been posting. I will have to keep playing. Does anyone else have tips for making your pictures bigger in blogger?
Friday, March 19, 2010
The $2 Treat Tray
Confession: I don't make pretty looking desserts. I've come to accept that fact about myself. So, when I saw these I knew I could make something adorable that I could put my ugly treats on.


This will be a short tutorialette, for more details click on the link above.
I found two trays at the dollar store and two candle holders at DI. (Goodwill)
Then I cut up some scrapbook paper into one inch strips and started mod podging them onto the tray. Then I put two more coats on top, and when that dried I did one coat of spray shellac.
Then I filled the candle holders up with some fake flowers and gorilla glued that to the bottom of the tray.Now I have to decide if I should glue them in a stack (kind of tall)
Or leave them as is, side by side. What do you think?


Or leave them as is, side by side. What do you think?
Tuesday, March 16, 2010
Dollar Store Easter Centerpiece
 I was cruising through the dollar store the other day and found these items: A rectangle planter box and 4 of these candle holders. I thought I would try my hand at making something cute out of nothing. I don't really have the "gift" to do this, but I thought it turned out pretty cute, pink, Springy, and Eastery.
  Supply List:
Rectangle Planter Box
4 Candle Holders
Scrapbook Paper
Decorating items for eggs
Paper Mache Eggs
Styrofoam and or Plaster of Paris
Easter Grass
Wire Hanger
Ribbons
Finish Spray
Mod Podge
 First I used Mod Podge to attach some paper to the planter box. (1 Coat to attach, 2 coats on top to seal). I also used a finish spray and hot glued a piece of ribbon around it.
Then I needed to fill it up somehow. A big piece of styrofoam would work. I tried to fill mine will a bucket of plaster I had, but it still only filled it up half way. So, I bought some wet foam. It cuts super easily and filled the rest of it up with this. I had some paper mache eggs I bought last year after Easter. I painted them in Eastery colors and then decorated them. One I used glue dots with glitter sprinkled on them, another rub-ons, another I mod-podged die cuts. Get creative!
 I pressed the candle holders into the foam. I tried hot glue and gorilla glue, but the foam doesn't adhere very well, so it is not very stable. If you have an idea for that, let me know. Just don't leave this decoration down where little hands can destroy it.
I had some paper mache eggs I bought last year after Easter. I painted them in Eastery colors and then decorated them. One I used glue dots with glitter sprinkled on them, another rub-ons, another I mod-podged die cuts. Get creative!I pressed the candle holders into the foam. I tried hot glue and gorilla glue, but the foam doesn't adhere very well, so it is not very stable. If you have an idea for that, let me know. Just don't leave this decoration down where little hands can destroy it.So, then I cut up an old shirt and pinned it down to cover up the foam. Then I hot glued some easter grass on top of that and trimmed that up with scissors. Do you really think I could make a holiday decoration without a wire hanger? So, for the handle part of the basket. I took my exacto knife to make a little hole in the sides. Then I put my wire hanger through these holes to make a half circle. Then I cut up a bunch of these transparent ribbon and starting tying them around the handle.
 And there you have it. This was a little more time consuming than most of my projects, but I thought it turned out pretty cute.
Do you really think I could make a holiday decoration without a wire hanger? So, for the handle part of the basket. I took my exacto knife to make a little hole in the sides. Then I put my wire hanger through these holes to make a half circle. Then I cut up a bunch of these transparent ribbon and starting tying them around the handle.And there you have it. This was a little more time consuming than most of my projects, but I thought it turned out pretty cute. Saturday, March 13, 2010
Raspberry Ricotta Pancakes

I was watching "The Best Thing I ever Ate" on the Food Network and they featured some blueberry ricotta pancakes. Yum! Since I knew I wasn't going to get to whatever big city the restaurant was in anytime soon, I needed to take matters into my own hands.
I'm not a plain buttermilk and maple syrup fan. If I'm going to intake that many calories it needs to be more worth it than those are. But lately I'm discovering that you you switch it up and make yummy and flavorful pancakes with different syrups than boring old maple.
It all started with the raspberry sourcream pancake mix and the strawberries and cream pancake mix from The Prepared Pantry. Top it with some vanilla syrup (see below) and you are in heaven.
So, anyway I researched the ricotta pancakes and found a great one here. It uses a mix so it makes up just as fast as regular. Here is my version:
Raspberry Ricotta Pancakes
1 2/3 cup water
1 1/2 teaspoons vanilla extract
2 cups pancake and waffle mix (I used Bisquick)
1 cup whole milk ricotta cheese
2/3 cup frozen raspberries, thawed a litte bit in microwave
1 1/2 teaspoons vanilla extract
2 cups pancake and waffle mix (I used Bisquick)
1 cup whole milk ricotta cheese
2/3 cup frozen raspberries, thawed a litte bit in microwave
Melted butter
Directions
Using a rubber spatula, stir 1 2/3 cups of water and vanilla in a large bowl. Add the pancake mix and stir just until moistened but still lumpy. Stir in the ricotta into the pancake mixture, then stir gently to incorporate the ricotta but maintain a lumpy batter. Fold in the raspberries.
Using a rubber spatula, stir 1 2/3 cups of water and vanilla in a large bowl. Add the pancake mix and stir just until moistened but still lumpy. Stir in the ricotta into the pancake mixture, then stir gently to incorporate the ricotta but maintain a lumpy batter. Fold in the raspberries.
Heat a griddle over medium heat. Brush with the melted butter. Working in batches, spoon 1/4 cup of batter onto the griddle for each pancake. Cook until golden brown, about 3 minutes per side. Top with vanilla syrup.
I got this recipe from my friend Mary. Some call it candy syrup because it is so good. I like to think of it as weekend syrup. Because if you eat your Kashi and Protein shake for breakfast all week, you deserve this naughty syrup for breakfast on the weekend.
Vanilla syrup
1/2 cup buttermilk (or mix 1/2 cup milk with 1/2 tbsp. lemon juice and let sit for five minutes)
1 cup sugar
1/2 butter (no subsitutes)
1 tsp. vanilla
1/2 tsp. baking soda
Bring buttermilk, sugar, and butter to a boil. Take off heat. Add baking soda and vanilla. Stir. Serve immediately. (But you can make ahead of time and heat before eating)
You've got to try this! It is so yummy!
Friday, March 12, 2010
Hanging out with wood and Mod Podge
 Last night I worked on three projects involving wood, mod podge, and my stash of scrapbook stuff. First, I did a quick Easter project. I found this egg shape at the Dollar Store.
  I had envisioned getting all fancy with layering and ribbons, but then I found one piece of scrapbook paper that was already layered for me. I guess I'm a simple girl at heart.
 I needed a little help seeing what it would look like, so I cut a template out of scrap paper before, I cut out the real paper and used mod podge to attach it. I should have bought three more to make a little set, but oh well.
Remember this board?? Well, sometimes being cheap works out and something it doesn't. I didn't want to buy jumbo clothespins, so I used regular. Then they all fell apart. So I broke down and bought some.

 And while I was there I bought a couple more of the bigger kind to decorate for picture holders:


Nothing too exciting, but these were my project this week.
And while I was there I bought a couple more of the bigger kind to decorate for picture holders:Nothing too exciting, but these were my project this week.
Tuesday, March 9, 2010
Easy Hamburger Cookies
.JPG)
Spring is starting to tease us around here. It was 40 yesterday and I didn't even wear a jacket to run errands! So, it is getting my in the mood for summer foods and parties. Here is an easy treat that I've been making since I was about 9. I got a BHG Kids Cookie Cookbook for Christmas and this recipe came from there. Except, they called for york peppermint patties. Trust me, grasshopper cookies are way yummier.* It is always a hit at BBQ's and better yet, you can sit back and let your kids make the whole thing.
Hamburger Cookies
Few drops water
Few drops green food coloring
1/2 cup flaked coconut
48 vanilla wafers
24 grasshopper cookies
sesame seeds or poppy seeds
Turn over to 350. In a small screw-top jar combine the water and the green food coloring. Add coconut; cover and shake until all of the coconut is tinted. Set aside.
Place half of the vanilla wafers, flat side up on an ungreased cookie sheet. Top each with a grasshopper cookie. Place in the oven for about 1 minute or just until chocolate begins to soften.
Immediately sprinkle each with a tsp. of tinted coconut. Top with another vanilla wafer. Press gently. Brush the top vanilla wafers with just enough water to moisten so the sesame seeds will stick.
Sprinkle each cookie with a little sesame seed and serve.
*Make your own grasshopper cookies. Find out how here.
Subscribe to:
Comments (Atom)