Showing posts with label CREATE. Show all posts

Saturday, May 22, 2010

Friday, May 21, 2010

Sew Great

DSC05835 Been on a bit of a sewing kick lately. Here are some of my projects. I took a hand-me-down shirred tank-top and sewed on a four- tiered skirt to it.
DSC05844

Who knew you could sew a hat out of an old T-shirt? Perfect for pulling on for early morning garage sales! Find out how here.
DSC05846

I bought this dress dirt-cheap at Old Navy, but it was too short. I took inspiration from this http://alisaburke.blogspot.com/2010/03/petticoat-tutorial.html, only I sewed a length onto the dress and then added the ruffles. Not sure if I am in love with this or not. Me and my mom are working on a eyelet slip skirt to wear under a couple of other clearance dresses that were too short. If I like it maybe I will unpick it and wear that instead.
DSC05854

DSC05852
The 20-Minute Skirt. Ok, it took me about an hour, but that was more for operator error than anything else.
DSC05847


Monday, May 10, 2010

4th of July Dress

DSC05806
What do you get when you combine two hand-me-down patriotic tank-tops with one of my old white shirts? This 4th of July dress!
I know-we still have two months to go, but I love the 4th of July! She already has her outfit all ready.
I cut up my old white shirt to to make the skirt to sew to the red tank top. Then, I cut up the cute words and graphics from the other tank and appliqued it to the skirt.

DSC05809

DSC05810

DSC05811

Wednesday, April 21, 2010

Chipboard Chunky Necklace

DSC05775

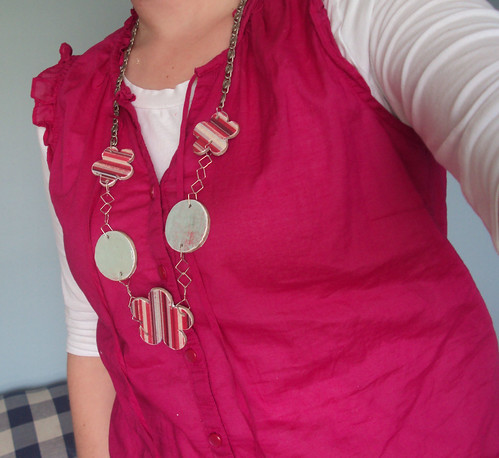
Roberts (our big local craft store) is going out of business. Sniff. But, I have been stocking up on some goods as they are closing out their merchandise. With some of my goods I came up with this necklace.

step1

Supplies:
Chipboard shapes
Largish Jump Rings (I had square ones)
Pliers
Scrapbook Paper
Modge Podge
Diamond Glaze
Big Bite
Necklace Chain

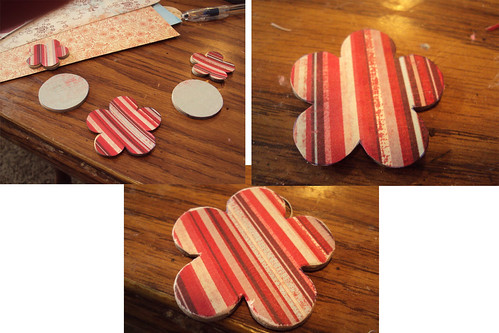
So, first I laid out the shapes in a way that I liked.
Then, I traced the shapes onto scrapbook paper and cut them out. Then I applied to the chipboard with mod podge. After that I filed the edges to give it a more worn look.

step2


Then, apply a layer of Mod Podge to the top of that and let dry. After that is dry,
add a lay of Diamond Glaze and let sit at least overnight.

Repeat for the opposite side, because the chipboard will flip. Choose the same paper or coordinating paper.

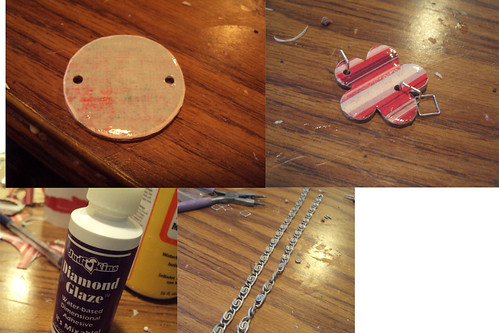
Then I used my Big Bite to punch holes through the sides.


step3

After that I put about 5 jump rings in between each chipboard piece. Then I used my pliers to cut the chain to the length I liked, and attached the chain with more jump rings. Then I used one final jump ring to attach the chain together. (It is long enough that it slips over my head and doesn't need clasps or anything)

Friday, April 16, 2010

I made a shirt!

DSC05748ed
I never thought I could actually make a shirt that was wearable! It's not perfect, but
I am in love with it. And it was really fun to make.

Even a beginner sewer figured it out.

Check out the original tutorial found here, which was featured here.

If you are interested, these posts are terrific. The only thing I did a little differently was add a band around the bottom, with a matching applique from the top material, with a zig zag stitch hem.

She also started the sizing at Size 2, and told you how to go up for additional sizes. I wanted a size 1, so I went down the recommended amounts instead of up.

DSC05748


Tuesday, March 30, 2010

Homemade Marshmallow Easter Eggs


This is a work in progess recipe/tutorial. Any additional tips or changes will be in red.

I know what you are thinking, store bought chocolate marshmallow candy isn't really that good. Trust me, I know. I won't touch the stuff. But this homemade version will change your mind. It is soooo good. Even though I haven't finished mine, I have had my MIL's and my sister-in-laws many times.

So, if it is so good, why haven't I tried it yet? A few reasons. One maybe laziness, another maybe a secret rebellion against the family tradition. But, then I heard on the radio about a huckleberry flavor at The Prepared Pantry. And the thought came that a huckleberry flavored chocolate marshmallow Easter egg just might be to die for. (Not that the cherry, lemon, and orange from the in-laws weren't already really good, but come on--Huckleberry!) So, I gathered up the kids and headed to Rigby to get some. While I was there I drooled over the apricot and raspberry flavoring, but decided to be good and only get the huckleberry and the lemon. I might have to go back and get the others very soon.


I, of course, had to sample both flavors in the mixing bowl, and trust me this is going to be good.

So, here is the 411:
Chocolate Marshmallow Easter Eggs
For each batch you will need:
1 Envelope Gelatin
1/3 cup cold water
1/2 cup sugar
2/3 cup corn syrup
1 teaspoon vanilla (yeah right!) or other flavoring
Food coloring to match the flavor
Flour
Cold Egg
2 cups chocolate chips (milk chocolate will bring out the flavor better, but I actually love using the candy bar melting bar from Sam's Club, you don't have to add anything to it)
2 Tbs. oil

Put 1-2 inches of water in a pot on high heat to get to a rolling boil. Soften 1 envelope gelatin in 1/3 cup cold water in a glass bowl that will fit over the pot, add sugar. Place over boiling water and stir until dissolved, leave it on the full boil for about 6-7 minutes, then turn off the heat but still leave it on for another 2-3. The liquid should be almost clear. My sister-in-law also said she has let her marshmallows it the fridge before dipping. I haven't tried that yet. I was trying to make two batches at once until I realized I only have one mixer. So, probably better just to do one at a time.

Pour the corn syrup into your mixer bowl. Add flavoring and food coloring. Pour gelatin mixture in and beat on high speed for 10-14 minutes. Mine took 14 minutes. The color and consistency should be toothpaste- like. Not too runny but not too thick either.

While you are waiting for that to mix, prepare your 9x13 pans. Fill them up with flour, and then make depressions with your cold egg. Then take a small measuring cup and start filling up your depressions with the marshmallow mixture. It is kind of fun to play with because it won't stick to the flour.

Let the marshmallows sit on your counter for until set up. I would say at least 6 hours or overnight. They should be fluffy and not gel-like or liquidy on the inside.
When you are ready, melt your chocolate chips and oil together to dip the marshmallows. Put the dipped eggs onto waxed paper on a cookie sheet and set in fridge until it hardens. (About 10-20 minutes).

After it hardens you can decorate with white chocolate drizzles, sprinkles, etc. I did some sugar sprinkles on my first batch, but I actually think it detracted from the flavor. I guess you have to decide if you are going for looks or taste.
My sister-in-law put a great tip in the comments. She said to take a plastic fork and break off the two inner prongs, and it makes a great dipping tool. We took a chocolate dipping class that had a few tips for dipping. If the extra edges around your candy bug you, you can 1) take a knife and shave it off 2) take a super hot glass of water and rub your candy on it. It will melt that extra edge off. I can't remember anymore tips. Read the comments section for some more tips from my sister-in-law.


Trust me, after your family tries these you will have a new Easter tradition to do every year!

Friday, March 19, 2010

The $2 Treat Tray

Confession: I don't make pretty looking desserts. I've come to accept that fact about myself. So, when I saw these I knew I could make something adorable that I could put my ugly treats on.


This will be a short tutorialette, for more details click on the link above.
I found two trays at the dollar store and two candle holders at DI. (Goodwill)
Then I cut up some scrapbook paper into one inch strips and started mod podging them onto the tray. Then I put two more coats on top, and when that dried I did one coat of spray shellac.
Then I filled the candle holders up with some fake flowers and gorilla glued that to the bottom of the tray.
Now I have to decide if I should glue them in a stack (kind of tall)
Or leave them as is, side by side. What do you think?

Tuesday, March 16, 2010

Dollar Store Easter Centerpiece

I was cruising through the dollar store the other day and found these items: A rectangle planter box and 4 of these candle holders. I thought I would try my hand at making something cute out of nothing. I don't really have the "gift" to do this, but I thought it turned out pretty cute, pink, Springy, and Eastery. Supply List:
Rectangle Planter Box
4 Candle Holders
Scrapbook Paper
Decorating items for eggs
Paper Mache Eggs
Styrofoam and or Plaster of Paris
Easter Grass
Wire Hanger
Ribbons
Finish Spray
Mod Podge
First I used Mod Podge to attach some paper to the planter box. (1 Coat to attach, 2 coats on top to seal). I also used a finish spray and hot glued a piece of ribbon around it.
Then I needed to fill it up somehow. A big piece of styrofoam would work. I tried to fill mine will a bucket of plaster I had, but it still only filled it up half way. So, I bought some wet foam. It cuts super easily and filled the rest of it up with this. I had some paper mache eggs I bought last year after Easter. I painted them in Eastery colors and then decorated them. One I used glue dots with glitter sprinkled on them, another rub-ons, another I mod-podged die cuts. Get creative!
I pressed the candle holders into the foam. I tried hot glue and gorilla glue, but the foam doesn't adhere very well, so it is not very stable. If you have an idea for that, let me know. Just don't leave this decoration down where little hands can destroy it.
So, then I cut up an old shirt and pinned it down to cover up the foam. Then I hot glued some easter grass on top of that and trimmed that up with scissors.Do you really think I could make a holiday decoration without a wire hanger? So, for the handle part of the basket. I took my exacto knife to make a little hole in the sides. Then I put my wire hanger through these holes to make a half circle. Then I cut up a bunch of these transparent ribbon and starting tying them around the handle.And there you have it. This was a little more time consuming than most of my projects, but I thought it turned out pretty cute.