

I'm going to attempt to do a tutorial. It did give me a newfound respect for people who make easy to understand, detailed tutorials. I will do my best.
The final product will hold 24 Bakugans (2 in each pocket) and several cards
Supplies:
Heavy fabric (I used canvas) cut to 25 inches high x 18 wide (you might have to trim some off the bottom at the end)
Single fold bias tape (or make your own like I did-learn how here)Fabric for pockets (I used a sheet remnant I had from making curtains years ago. It was nice to have one long piece of material, but not necessary)
Large Eyelets or grommets
Ribbon
Mounting Hook with command strips
Fabric paint (or acrylic paint and textile medium)
1) Cut your heavy fabric to 25x18 wide
2) Cut a long piece of fabric 4 inches tall by 48 inches long.
3) Fold over 1/2 inch piece 0f fabric from the top and iron it down.
 4) Sew along the folded edge.
 5) Cut this long strip into 4 inch lengths. ** If you don't have a long strip of fabric you can do steps 2-5 individually. It just saves some time to do it all at once.
 6) Snip both corners of the bottom on each piece of fabric. Use the same corner as a guide so you can get equal corners.
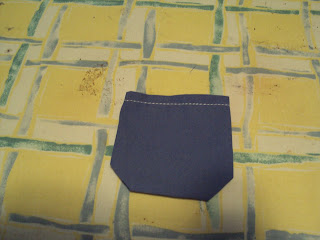
 7) Fold each side (Except the top) over a half inch and iron each side. Repeat for all pockets.

8) Arrange and pin your pockets onto your canvas.

9) I bought a twin needle when I first got my sewing machine and haven't used it yet. I thought this would be a fun place to try it out so the pockets would look more authentic. 
Sew around each pocket (leaving the top open). Read your manual to find out how to thread your twin needle. This is what the top of my machine looked like.

 10) For the card pockets on the bottom do the same thing as the Bakugan pockets. Except cut the fabric to about 4 3/4 tall by 4 1/2 wide. And I made these plain rectangles without the snipped corners. You don't have to the extra space between the top pockets and the bottom pockets like me. Don't ask!
11) Cut any extra fabric off of the canvas.
12) Sew your bias tape into place around the edges.

 13) For the BAKUGAN on top, I used the freezer paper stencil method found here. Only I found the coolest stuff you need to have in your supplies. It's called textile medium and it turns any acrylic paint into fabric paint (which is pricier than acrylic paint).
I found the logo online and copied it on my computer. Then in Photoshop I sized it to the size I wanted and printed it out for my outline on my stencil. I did a post earlier about using a Crystal Light canister. The little tubs can also be useful for things like mixing small paint projects. And plastic baby food jars can come in handy when storing the paint for the next coat.

And plastic baby food jars can come in handy when storing the paint for the next coat.14) Set your eyelets or grommets on the top. I used my Big Bite, but you can buy grommet setters at the fabric store if you don't have one. Then tie some ribbon through the holes. I hung it on the Command strips mounting hooks in my boys room.
Now, the Bakugans can be kept in one place. And I won't feel so guilty about my next 50 projects being for my daughter. If you make one of these, leave a link so I check it out. This could be adapted for any little toy like Polly Pockets etc.


This is such a fun idea! I need to try this - I wonder if it would help get the crazy little things off the floor!
ReplyDeletemissy
howdoesshe.com