Monday, February 15, 2010

Ribbon Necklaces

So, on my project list was these ribbons headbands. But, of course I got distracted and decided to use ribbon to make a necklace for my woodsie pendants using the same concept as the headbands. Ribbon necklaces are popular, and you can make ones that cost next to nothing.
I don't why I'm obssessed with pendants but I love making them. Not that I can wear them because as I uploaded pictures, my baby already ruined the first one shown. Oh well.

I finished mine two ways. Here is the first one:


Thread your pendant onto a ribbon cut to your preferred size.Dip one end into E-6000. I like this better than jewelry glue because it washes off your hands when you are done.Didn't get a picture of this, but put your end with glue into an end cap with loops. (Findings aisle at the craft store), then squeeze shut with pliers. Let dry. Then open up some jump rings and attach to the loop.Then you add the clasp of your choice to your jump rings.The other way I used my sewing machine. Cut the ribbon to length and then cut a piece of elastic the length you desire. You can also use a ponytail holder.
Fold the ribbon around the elastic and pin.Using a zig zag stich, go back and forth a few times to sew together.Repeat on other end and there you go.Sorry for the crappy picture. It's hard to take pictures of yourself or make your kids take good ones. I'm not sure if I love the back. Maybe the ponytail holder would look better. Or shorter elastic. Or you girls with long hair could pull it off. I will have to think on it. Let me know if you have any great ideas.

Saturday, February 13, 2010

Valentine's Day Gift

I don't know about the rest of you, but I always have a hard time thinking of something to get my husband on Valentine's Day. This year I decided to make something. And this is what I came up with:
I found this box around my house and I cut the top off.
I found some red "valentine-ish" paper and traced around the edges of the box.

I cut out the measured pieces and used Mod Podge to stick the paper to the box.

This is what it looked like with all the sides covered with the paper.


I used my digital scrapbooking program (that I love!) to make little signs that said "Happy Valentine's Day" and then underneath it I wrote a reason why I love him. I printed them off and then glued them to white cardstock and cut them into strips.

I folded them in half and filled little bags with some of his favorite candies and then stapled the reasons I love him to the tops.

I also made little coupons for various things like going to lunch at his favorite place or something we could do together. (With a new baby coming we just might need coupons to get out of the house! ;-) I put all the coupons in a little bag and sealed them together.

Then I stuck all the treats and coupons in the box with some tissue paper. And glued the "Happy Valentine's Day" message on the front.
What do you get your husband for Valentine's day? I am sure I will need another idea for next year!


Friday, February 12, 2010

Friend Valentine Party


Ok, it might be too late to try this out this year before Valentines Day, but you definitely need to put it in your Valentine file for next year.

For our "ladies" night last night, the host had each of us make Valentines for everyone in the group and then we passed them out Elementary style. Then we each wrote what we admire about the person on their Valentine.

I really felt like I was in 1st grade grade opening them and reading all the nice things people wrote. I have the best friends!

As a mom sometimes you go through life serving and giving to other people and don't realize how much it means to have someone say something nice to you until they do. Then it really means a lot and you realize how blessed you are.
Thanks for the great idea Jess!

Monday, February 8, 2010

Lazy moms version of Cinnamon Rolls (Cinnamon Pancakes)

So, let's face it. I make my kids eat cold cereal most mornings before school. On weekends, I'm a little more willing to make a hot breakfast, but usually not so far as to make actual cinnamon rolls or anything. So, this version is a pretty good substitute.

For the pancakes, just add cinnamon chips to your pancake batter. If you so lucky as to live by The Prepared Pantry, you can get some there. (If not, they have free shipping for orders over $65, and believe me it wouldn't be hard to find enough stuff for that!). Or Hershey's makes a good version too.

Then you make this cinnamon syrup that I found on cooks.com to add on top.

1 c. light corn syrup
2 c. sugar
1/2 c. water
2 tsp. ground cinnamon
1 c. evaporated milk

Combine corn syrup, sugar, water and cinnamon in a saucepan. Bring to a full boil over medium heat, stirring constantly. Continue stirring and boiling for an additional 2 minutes. Cool 5 minutes, then stir in evaporated milk.

What to do with your leftover cinnamon syrup? Try this!

Ok, maybe not quite as good a real cinnamon rolls, but a pretty darn good second!

Sunday, February 7, 2010

Homemade Butterfingers!

I was looking through the January/February issue of Food Network Magazine while my kids were finishing cleaning my husbands office (Yes we believe in child labor around here), when I saw a feature on cupcakes that tasted just like candy bars (Ie, York Peppermint Patties, Butterfingers, Snickers etc.)
I thought that sounded fun to try the Butterfinger Cupcakes for my sons 4th birthday party. They turned out really good. More work than I usually put into dessert, but for a special occasion I think it was worth it.
But the thing I was most excited about was that you can make your own butterfinger centers. Who knew? And it wasn't that hard. And I usually have most of the ingredients on hand. (Hint, you usually have sugar and peanut butter on hand, but if you live by a store that sells bulk foods like Winco, go buy a big bag of butterscotch chips to keep in your freezer--then you can make this whenever the mood hits!)
Homemade butterfinger brittle:
For the Brittle:
1/2 cup granulated sugar
1/4 cup creamy peanut butter
1/4 cup butterscotch chips
Make the brittle: Line a baking sheet with a silicone mat or parchment paper. Place the granulated sugar in a small saucepan over medium-high heat, bring to a boil and cook, swirling the pan but not stirring, until it turns amber.* Remove from the heat; stir in the peanut butter and butterscotch chips until smooth. Immediately pour the mixture onto the prepared baking sheet, smooth into a thin layer with a spatula and let cool. Break the brittle into pieces, place in a resealable plastic bag and crush with a rolling pin.
*It was a little weird not stirring the sugar. It just instinct to do so, but follow the directions and it is kind of magical what happens.

Now I'm not a big plain butterfinger fan, because I think butterfingers were made to go into milkshakes. Can't wait to try some with homemade butterfingers. Probably need to add a little chocolate though.

And I definetely need to try these next time I'm invited to a chocolate fondue party too. The possibilities go on and on.

PS. If you do try to make the cupcakes, the frosting didn't work out exactly how they said for me. The chips didn't melt like they said, so I would microwave it a little at the end to have it melt completely. Then I wouldn't put the bowl on ice. It made the frosting too hard to work with, so I would just let it cool for a while on the counter until it is spreadable.

Tuesday, February 2, 2010

Important Papers Board

Please tell me that I'm not the only one who gets piles like this:

Whatever happened to a paperless society? Anyway, sometimes in my pile of important papers, the most important ones get lost easily. Imagine that.

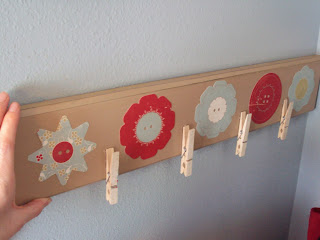
When I saw this board I knew exactly what to do with a board I had with vinyl letters that no longer matched my decor. I'm not going to use it for drying art projects though. I'm going to put the most important of the important papers on this board. And they will stay there until I don't need them anymore. Notes for events at school, this weeks recipes etc. etc.

To make, I just painted the color I liked, sanded the edges slightly, and used Mod Podge to adhere some cute cut-outs I had in my stash. Then I add paper to the front of some clothespins and used my GLUE GUN to glue those onto the board.
Don't mind the hand. It probably won't actually be hung on my wall until my husband is done with his busy time. But, I had to check #4 off my list. Because isn't checking things off of your list the best-virtually or not!

Monday, February 1, 2010

Carne Asada Tacos

So, it must be Mexican week around here. I also got the Mexican pack from Bountiful Baskets like La Tisha, and I had no idea what to do with it. Maybe I should have saved my tomatillas for her recipe. Sounds yummy.
Anyway, I went on Allrecipes and did an ingredient search for what I had and the result was these tacos. Here is my version-I made a few tweaks. They were very yummy!

Carne Asada Tacos
Ingredients
1 1/2 pounds boneless beef top sirloin (can use pork sirloin), cut into thin bite-size slices
1/2 teaspoon salt
1 teaspoon freshly ground black pepper
crushed red pepper to taste
Few Key limes
4 Fresh Tomatillas
1 fresh jalapeno peppers, seeded, and chopped into big chunks
4 tablespoons olive oil, divided
About 3/4 can of chicken broth

Flour tortillas
1 Green Onion, chopped
tomatoes, chopped
1 avocado - peeled, pitted and sliced, and chopped
1 bunch fresh cilantro, chopped

Directions
Place sliced meat into a shallow bowl, and season with salt, black pepper, and crushed red pepper. Squeeze the lime juice over the meat, and turn until evenly coated. Cover, and refrigerate for at least 30 minutes ( I did for about 7-8 hours)
In a blender or food processor, combine tomatillos and jalapenos with enough water that it will puree (not very much water) . Puree for 15 to 20 seconds, or until thick. Heat 1 tablespoon oil in a large skillet over medium high heat. Carefully pour in tomatillo mixture. Cook, stirring frequently, for 5 minutes. Stir in chicken broth. Reduce heat, and simmer for 20 to 30 minutes, or until mixture coats a spoon. Transfer mixture to a serving dish.
Heat tablespoon oil in a large skillet over high heat. Stir in 1/3 of the beef, and saute for 1 minute. Transfer to serving dish. Repeat with remaining beef.

To serve fill a tortilla with desired amount of meat, spoon over some tomatillo mixture. Top with onions, tomatoes, avocado and cilantro as desired. Squeeze 1/2 of a key lime over your taco when you are ready to eat.

Serve with rice and beans.
Who needs to go to a Mexican Restaurant now? Yum!